BonitoServiço

Com tecnologia do Blogger.
  • Home
  • Brincadeiras
  • Costura
  • Carnaval
  • Bebé
  • Jardim


De um modo geral as brincadeiras são a melhor maneira de aprender e explorar coisas novas mas, encontrar um tema interessante para as crianças nem sempre é fácil. muitas vezes quero pensar em alguma coisa rapidamente e tenho zero ideias, mas a verdade é que praticamente tudo pode ser transformado num tema interessante e com potencial para a brincadeira, as ideais para as transformar em brincadeira é que nem sempre surjem.
Há uns tempos, ainda no final de 2020 antes deste segundo confinamento a educadora do Tomás enviou uma mensagem a dizer que andavam a explorar as divisões da casa e os principais componentes de cada divisão e sugeriu que em casa déssemos algum ênfase ao tema de uma forma simples e descomplicada no dia-a-dia, como identificar a divisão para onde vamos e o que vamos fazer Ex: Vamos para a cozinha fazer o jantar. Nada de atividades obrigatórias nem coisas megalomanas e idealistas. Felizmente a educadora é uma pessoa extremamente consciente da realidade do dia-a-dia das famílias e não manda trabalhos de casa. Eles têm 2 anos! Vai sim enviando fotos do dia-a-dia deles na escola no grupo do wahtsapp e pontualmente diz-nos os temas que estão a explorar para quem quiser poder abordar as palavras, temas, músicas, etc em casa nas atividades do dia-dia. 
Achei que era um bom tema para uma brincadeira e decidi que ia mesmo preparar algo dentro deste tema, queria uma mini casinha! Inicialmente pensei em fazer uma casa 3D mas depois reconsiderei, ia dar muito trabalho e possivelmente não iria ser muito prática para ele explorar. Decidi então fazer uma casinha 2D bem simples, e fiz depois os diferentes componentes das divisões separadamente para que ele pudesse pegar neles e "mobilar a casa". Outro ponto relevante deste momento de idealização da brincadeira foi a decisão de que a casinha não seria para pousar na mesa mas sim para estar colada na vertical numa parede. Tinha lido um artigo, que agora não encontro, que mencionava que fazer atividades em diferentes planos como por exemplo, pintar numa folha pousada numa mesa, numa folha colada numa parede e numa folha colada no tampo por baixo da mesa apresenta diferentes estímulos à criança, estimulando a criatividade, a motricidade e mais um conjunto de coisas que já não me lembro.
As divisões da casa, as suas funções específicas e os seus diferentes componentes foram o foco desta brincadeira. Fiz a casinha tipo livro para ele poder abrir e fechar. Quando está fechada vê a fachada, quando abre vê os detalhes do interior. Para fechar usei um botão e um cordel. A grande questão era como fazer os diferentes componentes do interior de forma a que ele os pudesse pôr e tirar do sítio facilmente. Até que me lembrei dos post-its! Ta-dam, usei a zona de cola dos post-its para colocar atrás de cada elemento da casa, o sofá, o candeeiro, a cama, etc e funcionou super bem.
Colei a casinha na porta da sala e deixei-a fechada, sendo que colei todos os móveis no verso da fachada para ele depois os distribuir pela casa.

Generally speaking, games and play are the best way to learn and explore new things but finding an interesting topic for some playtime with children is not always easy. I often want to come up with something quickly and have zero ideas at that moment but the truth is that practically anything can be turned into an interesting playtime theme, we just need to find the best approach for it to become a great playtime activity.
A while back, still in 2020, Tom'as teacher sent us a whatsapp message letting us know they were exploring the different house rooms and the main components of each one suggesting we could give some emphasis to this on our daily activities at home in a simple and uncomplicated manner; like identifying the room we are entering and associating that with what we are going to do for example: we are going to the kitchen to make dinner.
Thankfully his teacher is not idealistic and does not establish any mandatory activities or demmands any homework for the kids or the parents (they are 2 years old, yes!). She sends us pictures of their daily activities and once in a while let us know more in depth the thematics they are exploring in case any parents want to further explore it at home during playtime through words, games, songs, etc.
But back to different room of a house I thought this was a good theme for some playtime and decided I was going to prepare something within this theme and I immediatelly thoought of making a mini-house. I first thought about making a 3D house but quickly reconsidered because it was going to take quite some time to make and it probably would not be very practical for him to explore it. So I decided to make a very simple 2D house and then make the different components separately so that he could then put them in place. During this "creative process" I also decided it was going to be a vertical playtime, meaning I would not place the house on a table but rather on a wall. I had read an article, that I just cannot find now, that mentioned the added value of having activities done in different orientations and perspective stimulating criativity, motricity and a bunch of other things.
Different home rooms and their specific components and function was the focus of this play time activity. I made a book like house so he could open and close it. When it is closed he sees the façade, when it opens he can see the details of the interior. To close it up I used a button and a string and it really worked out well.
The big question during this proccess was how to make the different components (furniture. etc) so that he could easily put it on and change its place. Until I remembered post-its were a good way to get that. So I used the glue area of the post-its and placed it behing the different elements and it worked really well.
I glued the house to our living room door with all the furniture on the back side of the façade for him to later distribute it, and left it closed.


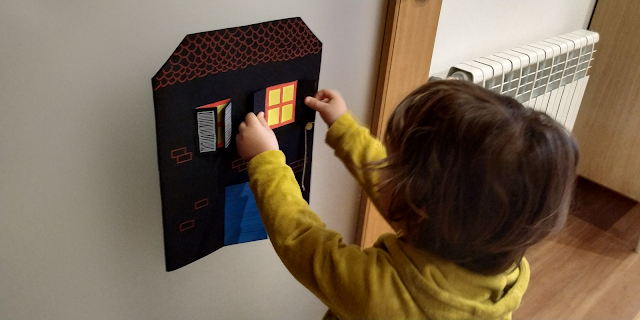
A verdade é que ele quando acordou da sesta e viu a casinha na porta foi lá direitinho. A casinha foi um sucesso, ele adorou poder pôr os moveis nos diferentes compartimentos da casa e até poder pôr tudo de pernas para o ar. Brincou com a casinha durante semanas e enquanto brincávamos fomos falando das divisões da casa e dos diferentes componentes.

When he woke up and saw the little house on the door, he went straight at it. The house was a success, he loved being able to put the furniture in the different rooms of the house and even being able to put everything upside down. He played with this house for weeks and while he played we talked about the different rooms and their different components.


De vez em quando ele decidiu colocar os móveis todos no telhado da casa. Acho que eram as limpezas da Páscoa e estava tudo a arejar.

From time to time he decided to put all the furniture on the house's roof. I guess it was Easter cleaning time and everyhting was airing.


Share
Tweet
Pin
Share
No comentários


Hoje o Tomás deixou cair o gel de banho dele em cima do meu pé descalço, assim com uma esquina mesmo em cheio do meu peito do pé. Claro está que eu "gani". No sítio do embate ficou logo um papinho escurinho e pronto, não digas que vais daqui. E sabem o que é que ele fez? Passou a mãozinha dele no meu pé e disse "Pronto, já passou mamã!"
E apesar daquela mãozinha fofinha eu pensei, já passou o caneco que ainda me está a doer. Só não verbalizei porque era aquela mãozinha fofa no meu pé e aqueles olhos lindões a olhar para mim. 
E depois dei por mim a pensar na expressão "pronto já passou", por acaso (mesmo por acaso) não é expressão que eu costume usar quando ele se magoa, mas obviamente na escola devem usar caso contrário ele não a diria...mas a verdade é que é um pouco desajustada não? Quando eles estão a chorar ainda não passou coisa nenhuma, ainda lhes está a doer ou ainda estão assustados ou seja lá o que for que estão a sentir.
Tendo em conta a minha semi-indignação quando ou vi a expressão pensei, ainda bem que não costumo dizer isto. E o que é que costumo dizer? "Pronto a mamã está aqui. Eu sei que está a doer" e dou beijinhos. Ok se calhar não é assim tão melhor mas pelo menos reconheço o sofrimento dele e não faço de conta que não existe.
Ou então isto foi só um desvario de final de dia.

Os pézinhos lindos da foto são do Tomás quando era recém nascido, bem mais bonito do que uma foto do meu pé obviamente.


Today Tomás let the shower gel bottle fall right on my bare foot, precisely with one of the corners on my foot. Off course it hurt and I said "auch", immediately there was a dark bump on my foot. Do you know what he did? He put is little gorgeous hand on my foot and said a very Portuguese expression "Pronto já passou" that I am not really sure how to translate but it means than the problem/pain/fear is already gone.
Despite his cute little hand I immediately thought no it is not gone; it is still hurting! And then all of a sudden, I thought about that expression, I don't usually use it but is not because I have thought about it. Off course although I don't use that expression probably at school they do and that is why he said it... but the truth is it is not really the best thing to say. When they are crying it is because it is still hurting, or they are still frightened or still feeling whatever feelng they are experiencing.
Taken my reaction to that expression I ended up thinking it is a good think we don't usually use that expression. What do I usually say? I usually say "Ok mummy is here, I know it hurts" and then I kiss him. Ok maybe it is not that much better but at least I am not ignoring his pain I am acknowledging it.
Maybe this was just a wild monday night thought.

Cut little feet on the photo are Tomas' feet when he was a newborn.
Share
Tweet
Pin
Share
2 comentários
 Há algum tempo que tenho andado a pensar qual seria a melhor brincadeira para falar sobre as emoções com o Tomás. Este tema não surgiu por nenhuma questão cronológica mas sim porque ultimamente ele começou a identificar quando as personagens dos desenhos animados estão tristes. A primeira vez que isso aconteceu foi quando vimos a curta metragem "Voar" da Disney Pixar. Apesar de provavelmente ele não compreender a totalidade da mensagem que a história pretende passar ele compreendeu as emoções e disse-me "mamã tá tiste o bebé". Se não conhecem vale muita a pena ver, é incrível como se conseguem passar de forma tão bem conseguida tantos sentimentos em menos de 10 minutos.

I have been thinking for some time what would be the best game to talk about emotions with Tomás. This theme did not arise for any chronological question but because lately he started to identify when the cartoon characters are sad. The first time this happened was when we saw the short film "Fly" by Disney Pixar. Although he probably did not fully understand the message that it tells, he understood the emotions and said "mommy the baby is sad". If you  have never seen it, it is definitely worth seeing, it’s amazing how you can get through so many feelings in less than 10 minutes.


Mas quando pensava em emoções pensava em caras com as diferentes expressões ou com uma boca que dá para rodar para ficar feliz ou contente e nenhuma das opções me estava a convencer tendo em conta que ele tem apenas dois anos e meio. Fiz uma breve pesquisa mas nada me convenceu, talvez estivesse a pensar nisto cedo demais.
Até que, no Carnaval, depois de ver o nosso Sr Cabeça de Batata a educadora do Tomás sugeriu que explorássemos os elementos que constituem a cara assim como as emoções dando várias ideias de caras, sendo que a que mais gostei foi a que tinha uma forma oval numa folha e depois os vários elementos da cara eram feitos com plasticina. Mas ainda assim não estava totalmente convencida. Ok era boa altura para falar de emoções, aliás sabemos que a capacidade de identificar emoções (nossas e dos outros) é uma competência social importante e na fase em que estamos faz todo o sentido explorar este tema com o Tomás. Ele gosta de plasticina mas para já o que gosta é de fazer bolinhas e quando me distraio de a comer. Decidi pesquisar mais um bocado, se calhar precisava só de uma atividade introdutória e depois podia passar à plasticina.
Nas pesquisas encontrei umas imagens de uns monstrinhos que achei muito giras e pensei que podia fazer cartas com os monstrinhos para ele agrupar, quando cliquei na imagem vi que a pocket of preschool tinha exatamente essa atividade delineada. Desenhei os meus monstrinhos com base nestes e fiz dois de cada emoção, sendo que selecionei apenas o feliz, o triste, o zangado e o assutado. Fiz então duas "cartas" com monstrinhos iguais para cada uma das emoções. A ideia era ter metade das cartas na mesa e dar a outra metade ao Tomás para ele fazer a correspondência. Preparei ainda um monstrinho grande sem cor, e pares de olhos e bocas separados para que depois ele pudesse montar ele os monstros das emoções.

Everytime I though about it  I thought about emotions all I could think off were faces with different expressions or with a mouth that can be rotated to be happy or sad and none of these options was convincing me because he is only two and a half years old. I did a little research but nothing convinced me, maybe I was thinking about it too early.
But at Carnival, after seeing our Mr Potato Head Tomás’ teatcher suggested we explored the elements of a face as the emotions. She sents us several suggestions and the one I liked the most was the one that simply had a circle on a piece of paper and then the various elements of the face were made with play dough. But I was still not entirely convinced. Ok but this ment that it was a good time to talk about emotions, in fact we know that the ability to identify emotions (ours and others) is an important social competence and taking in consideration everything around us right now, it makes perfect sense to explore this topic with Tomás. He likes play dough but for now what he likes is making balls and whenever I am not looking he also likes to eat it. This being said I decided to do some more research, maybe I just needed an introductory activity and then I could move on to play dough emotions.
While looking out for ideas I found some images of little monsters that I found very cute and I thought I could make some flashcards with the little monsters for him to pair up. When I clicked on the image I saw that the pocket of preschool had exactly this activity outlined. I drew my little monsters based on these and made two of each emotion; I selected only the happy, the sad, the angry and the frightened. I made two "cards" with little monsters for each of the emotions. The idea was to have half the cards on the table and give Tomás the other half for him to pair up. I also prepared a large monster and separate pairs of eyes and mouths so that afterwards he could build up the emotion monsters.


Mal eu sabia que isto do monstro das emoções é todo um mundo. Quando mostrei à educadora ela sugeriu-me logo esta música e esta história para complementar a atividade. E foi aí que percebi que há imensas coisas à volta do monstro das cores (ou das emoções como eu o batizei).
Quando o Tomás acordou ainda estava meio ensonado e então começamos pela música e ele adorou, quis ouvir segunda vez; depois passamos à história e aconteceu o mesmo "outa dêz mamã".
Depois disso passamos aos conjuntos de monstrinhos e ao monstrinho grande. A brincadeira correu muito bem.

Little did I know that this emotion monster was really a thing. When I showed my monsters to his teatcher, she immediately suggested this song and this story to complement the activity. And that's when I realized that there are a lot of things around the colout monster (or the emotion monster as I called it).
When Tomás woke up he was still sleepy so we started with music and he loved it, he wanted to hear it a second time; then we moved on to the story and the same "again mommy" happened.
After that we moved on to the monster sets and the big monster. This playtime went very well.


Continuamos a ouvir a música e a história a pedido dele e dois dias depois preparei uma nova atividade com os monstrinhos para ele. Pintei quatro rolos de papel higiénico e preparei bocas, olhos e orelhas para ele montar os monstrinhos. Ele colou o monstro feliz, o triste e o zangado e depois pediu-me para eu colar o assustado. À medida que ia fazendo os monstrinhos juntava a carta com o monstrinho correspondente. Desta vez ele não esteve propriamente entretido muito tempo mas deu voltarmos a falar das emoções e claro a ouvir a música e a história. Claro está que durante estas brincadeiras também falamos muito das cores. Nos dias seguintes os monstrinhos andarem sempre atrás dele de um lado para o outro. E noutro dia lembrou-se e foi buscar o monstro grande e montou as caras do zangado, do assustado e do feliz. O monstro preferido dele é o zangado.

We continued to listen to the music and the story at his request and two days later I prepared a new activity with the little monsters for him. I painted four rolls of toilet paper and prepared mouths, eyes and ears for him to assemble the little monsters. He made the happy, sad and angry monsters and then asked me to finish the scared one. As he would finish each monster we would pair it with the corresponding flashcard. This time he was not entertained for a long time but he did talk about emotions and of course listen to the music and the story once again. Of course, during these games we also talk a lot about colors. In the following days the little monsters were always with him all around the house. And the other day he remembered and went to get the big monster and made the faces of the angry, the scared and the happy. His favorite monster is the angry one, this was true in all the games we played.


Passados uns dias resolvi manter a explorar este tema e usei tampinhas de iogurte para desenhar caras e duas folhas de cartolina para desenhar os bonecos onde ele tinha que colocar as caras. Aqui já tínhamos também algumas expressões corporais associadas às expressões faciais. O boneco assustado tinha as mãos na cara, o zangado tinha as mãos na cinta e o feliz tinha os braços no ar e as pernas também.
Ele gostou da atividade e desta vez a brincadeira chamou a atenção da avó que também quis brincar. Ele dava as tampinhas uma a uma à avó e ela ia pondo no sítio sendo que ele muitas vezes lhe dizia logo qual era o sítio. Há uns dias lembrou-se e foi novamente buscar esta brincadeira, deu as tampinhas brancas e a folha correspondente à avó e ele ficou com a roxa. E a verdade é que demoraram sensivelmente o mesmo tempo a por todas as tampinhas. Depois quisemos que eles trocassem as folhas e as tampinhas mas ele disse logo que não queria as brancas, as dele eram as roxas.

After a few days I decided to keep exploring this theme and used yogurt bottle caps to draw faces and two sheets of white cardboard to draw the dolls where he had to put the faces. With this game we could explore not only facial expression but also some body language. The frightened doll had his hands on his face, the angry one had his hands on his waist and the happy one had his arms in the air and his legs too.
He liked the game and this time the game caught the attention of the grandmother who also wanted to play. He gave her the caps one by one and she would put them in the place, though he would often tell her right away what the place was. A few days ago he remembered this game and went to get it again. He gave the white caps and the corresponding sheet to grandmother and he got the purple one. And the truth is that it took roughly the same time for both of them to put all the caps on the right places. Then we wanted them to exchange the sets, but he said right away that he didn't want the white ones, his were the purple ones!


Esta semana decidi voltar às emoções e agora sim experimentar as caras com plasticina. Desenhei um circulo numa folha branca e para ajudar preparei logo algumas bolinhas e rolinhos para os olhos, boca, cabelos etc. A primeira cara fiz com ele e depois deixei-o explorar livremente. Claro está que depois de fazermos os dois juntos a primeira cara ele disse-me logo que faltavam orelhas e nariz e por isso la tratamos de fazer duas orelhas e um nariz. À medida que brincamos íamos dizendo que emoções estávamos a retratar. 

This week I decided to come back to this theme and finally try the playdough faces. I drew a circle on a white sheet and to help kick off the game I prepared some balls and curlers for the eyes, mouth, hair etc. We build up the first face together and then I just let him explore freely. Of course, after we both made the first face together, he told me right away that ears and nose were missing so we had to make two ears and a nose. As we played, we were saying what emotions we were portraying.


Ele gostou e entusiasmou-se a fazer algumas expressões, ia apertando a plasticina, esmagando contra o papel e a certa altura distraiu-se completamente com a plasticina e já só estava a brincar com a plasticina sem foco nas emoções. Tudo a correr lindamente até que olhei para o lado uns segundos e ele decidiu enfiar um rolinho azul de plasticina, dos que usamos para os cabelos, por uma narina acima. Claro que depois ficou aflito e disse "Mamã tem dói dói, tira, tira!" por momentos estava a ver que íamos começar o dia numa viagem às urgências mas felizmente com calma e algum choro lá consegui tirar a plasticina com uma pinça. Ufa... Depois disto disse-me "Na qué mais monsto mamã!" que basicamente era ele a dizer não quero brincar mais a isto, com referência aos monstros porque foram os protagonistas da primeira brincadeira que fizemos relacionada com as emoções.

He liked and was excited to make some faces, off course at some point he started to press all the playdough details, crushing it against the paper and at one point he was completely distracted with the playdough and was just playing with it without focusing on emotions, and that was just great as well. Everything went beautifully until I looked  away for a few seconds and he decided to stick a blue roll of playdiugh, the kind we use for hair, up his nose. Of course, afterwards he was distressed and said "Mom it hurts it hurts, take it off, take it off!" for a moment I feared that we were going to start the day with a trip to the emergency room, but fortunately I managed to remove it with tweezers. Phew ... After that, he said to me "Mummy I don’t want monsters anymore!" that basically him saying he did not want to play this game anymore. Though we were not playing with monsters it was the first game we made on emotions and so he correlated both activities.


Estas brincadeiras tiveram claramente um efeito positivo na capacidade do Tomás em reconhecer emoções e isso notou-se no dia-a-dia. Noutro dia ele estava a deitar os Kiconicos na cama e disse-me "mamã o Kico está feliz, este kico tamém está feliz..." para além disso quando vemos bonecos animados ele já reconhece e verbaliza quando as personagens estão assustadas, zangadas ou felizes e não apenas quando estão tristes.
Posto isto, este conjunto de brincadeiras foi claramente bem sucedido para além de muito divertido.

These games clearly had a positive effect on Tomás' ability to recognize emotions and this was clear on a daily basis. The other day he was laying his Kiconicos (teddy bears) on the bed and told me "mom Kico is happy, this kico is also happy ..." in addition to that when we see animated movies he already recognizes and verbalizes when the characters are scared, angry or happy and not just when they are sad.
That being said, in addition to being a lot of fun this set of games was also clearly successful.


Share
Tweet
Pin
Share
No comentários


O Carnaval não é uma data nada consensual mas, tanto quanto me lembro, eu sempre gostei do Carnaval. Continuo a gostar particularmente da fase de planeamento, pensar o que vai ser o disfarce, como o vou fazer, os pequenos detalhes, expectativa à medida que o disfarce vai estando pronto e os detalhes que vou acrescentado no percurso.
Acho que de facto, estes são os meus projetos de costura favoritos. Sempre gostei de fazer os fatos de Carnaval e Halloween do meu sobrinho, e ele também gostava bastante da fase de planeamento, gostava imenso de escolher de que se ia mascarar e de pensar nos detalhes. Lembro-me de estarmos a fazer o fato de astronauta e de ele estar maravilhado a ver a máquina de costura a trabalhar, de querer ver todos os detalhes e de ver o entusiasmo dele com os preparativos.  Agora já está crescido e já não se quer mascarar mas, tenho o Tomás e a prima quase da mesma idade que ainda hão-de querer muitos fatos. 
Este ano confesso que por uns segundos ainda ponderei fazer de conta que não existia Carnaval, a vida anda de pernas para o ar, não tenho tempo para nada como é que ia ter tempo para fazer um fato? Mas não, não ia ignorar o carnaval precisamente por isso. Os dias estão irreconhecíveis, as rotinas a fugir por entre os dedos e sonhar acordado tornou-se mais importante do que nunca aqui em casa. Por isso de uma forma ou de outra ia fazer um disfarce para o Tomás; apesar de ele com os seus 2 anos ainda não dar uma grande importância à data nem à máscara.
Tendo em conta a paixão dele pelo Toy Story e pelo Buz Lightyear o fato tinha que ser de Buz Lightyear. Tinha que ser algo simplificado para que eu o conseguisse fazer em tempo útil, e o mais prático e confortável possível para ele usar em casa durante o dia. Claro está que simples, simples era fazer alguma coisa só em cartão mas não ia ser suficientemente confortável para ele usar mais do que uns minutos. 
Foi então que nas minhas pesquisas encontrei este fato bem simples de Buzz Lightyear da Sew Simple Home e decidi que era este o caminho a seguir, um fato simples em forma de avental que ele podia tirar e pôr facilmente e que ia ser maleável e confortável caso ele o quisesse usar muito tempo. Para fazer o fato usei os moldes da Sew Simple Home, fiz apenas alguns ajustes (é mais forte do que eu). Como estamos fechado em casa e as lojas de tecidos também estão fechadas tinha que fazer o fato com o que tinha em casa; fui ao stock de feltro e tinha verde, roxo, vermelho e azul mas branco nem por isso...

Carnival is not a consensual date but as far as I remember I always liked Carnival. I still do, particularly the planning stages, thinking about what the disguise will be, how I am going to do it, the small details, the growing expectation as the disguise is getting ready and the details that I add during the course of its preparation.
These are in fact my favorite sewing projects. I always liked to make my nephew's Carnival and Halloween costumes, and he also really liked the planning stage. He liked the proccess of thinking what we wanted to be and then elaborate on the details. I remember we were doing the astronaut suit and he was delighted to see the sewing machine at work, wanted to see all the details. He was really enthusiastic about the costume’s preparation proccess. Now he's all grown up and no longer wants to dress up, but I have Tomás and his cousin almost the same age who will both still want many costumes.
This year I must say that for a few seconds I considered to pretend that there was no Carnival. Our lifes are upside down, I don't have time for anything, how would I have the time to make a costume? But no, I wasn't going to ignore carnival for that exact reason. The days are unrecognizable, the routines are running through our fingers and daydreaming has become more important than ever here at home. So, one way or another, I was going to make him a disguise; although at the age of 2 he still does not give much importance to the date or the costume itself.
Bearing in mind his passion for Toy Story and Buz Lightyear, there was no way around it the costume had to be Buz Lightyear's. Nevertheless I needed to make it simple so that I could do it in time. It also needed to be as practical and comfortable as possible for him to wear ir at home during the day. Of course, really simple was to do something only with cardboard but it would not be comfortable enough for him to wear more than a few minutes.
While braisnstorming and looking out for ideas I found 
this very simple Buzz Lightyear suit from Sew Simple Home and decided that this was the way to go, a simple suit in the shape of an apron that he could take off and put on easily while being malleable and comfortable if he wanted to wear it  for long periods of time. To make the suit I used the Sew Simple Home molds, I made a few adjustments (it is stronger than me) mainly on the details shapes. As we are in lockdown and the fabric stores are also closed, I had to do it with what I had at home. So I went to my felt stash and there was green, purple, red and blue but white felt not really ...


Neste ponto o fato super simples e rápido de fazer deixou de ser assim tão simples e rápido, a alternativa ao feltro branco foi tecido branco de um lençol rasgado mas isso significa que não foi só cortar, já envolveu a máquina de costura. E já que a "tela" branca estava costurada não ia simplesmente colar os detalhes de feltro, tinha que os coser à mão para ficar bem bonitinho. Ou seja, deixei o meu lado perfecionista tomar conta do fato de Carnaval, isto significa que na segunda feira fiquei até às tantas para acabar o fato, e ainda assim só cosi os detalhes na frente do fato os das costas poderão ser cosidos algures no futuro, se eu vir que ele continua a querer brincar com o fato.
Nesta altura de confinamento eu guardo todas as caixas que entram aqui em casa  porque há sempre projetos para lhes dar uso, e as asas do Buzz Lightyear foram um deles. A peça central é um cartão de um pack de 6L de leite e as asas propriamente ditas foram cortadas de uma caixa de cartão. Depois foi só pintar, usei os marcadores multisuperfície da Giotto (adoro estes marcadores porque para além de pintarem muito bem têm cores super vibrantes) e o roxo foi mesmo com o marcador Giotto be-bé do Tomás.

At this point the super simple and quick costume became a not so simple and quick preparation costume, the alternative to white felt was white fabric from a torn sheet but that means it was not just cutting, it also involved the sewing machine. And since the white "canvas" was sewn, I wasn't just going to glue the felt details, I had to sew them by hand to look really cute. In other words, I let my perfectionist side take care of the Carnival costume, this means that Monday night I stayed up until late hours to finish the costume, and yet I only sewed the details on front of the costume, those on the back can eventually be sewn somewhere in the future , if I see that he really likes to play with the costume.
At this stage into the lockdown I keep all the boxes that come into the house because there are always projects to use them, and the wings of Buzz Lightyear were one of them. The centerpiece is a cardboard from a 6L milk pack and the wings themselves were cut from a cardboard box. After cutting and glueing I just painted, I used Giotto's multi-surface markers (I love these markers because in addition to painting very well they have super vibrant colors) and the purple was painted with Tomás’ Giotto be-bé markers.


Na terça-feira de manhã ele não quis vestir o fato e por momentos pensei, porque raio fiquei eu a fazer uma noitada se agora ele nem quer o fato. Mas a verdade é que ao final da manhã quis vestir o fato e voar claro, ou seja, quis que lhe pegasse ao colo para ele voar. De tarde este registo continuou e a verdade é que fiquei super contente por ele se estar a divertir com o fato neste Carnaval atípico em que ele não foi vestido para a escola, não brincou com os amiguinhos e nem sequer saímos de casa para ir ao parque.
Ao final do dia quis mostrar o fato aos avós quando fizemos videochamada e claro também quis voar, e disse vezes sem conta "Sou o Buzz Lightyear!"
Mas, para mim a verdadeira prova de que fiz bem em fazer o fato foi quando esta semana ele viu uma caixa se sentou nela e disse "Sou o Buzz Lightyear! Mamã traz o Buzz..." e lá fui eu buscar as asas do Buzz que ele quis pôr de imediato. E ali esteve o Buzz na sua nave espacial, a pedir para voar "mamã faz voá!" e enquanto voava dizia "Para o infinito e mais além!", claro que mal o pousava ele dizia imediatamente "outa vez..." Nem consigo expressar em palavras a satisfação que me deu vê-lo assim a brincar ao faz de conta com as asas do Buz.

On Tuesday morning he didn't want to wear the suit and for a moment I thought, why did I stay up long hours if now he doesn't even want the suit. But the truth is that at the end of the morning he wanted to wear the suit and fly, that means, he wanted me to be held him up in the air so he would be flying. In the afternoon this continued and the truth is that I was super happy that he was having fun with his costume in this atypical Carnival in which he could not go dressed up for school, did not play with his friends and we did not even leave the house to go for a walk in the park .
At the end of the day he wanted to show the costume to my grandparents when we made a video call and of course he also wanted to fly, and said over and over "I'm Buzz Lightyear!"
But, for me the real proof that it was a great decision to make this costume was when this week he saw a box sat on it and said "I'm Buzz Lightyear! Mom bring Buz ..." and off I went to get Buz’s wings that he put on right away. And there he was Buzz in his spaceship, asking to fly "Mommy make it fly!" and as he flew he said "To infinity and beyond!", of course, as soon as he landed, he would immediately said "again, again..." I can't even express in words the satisfaction that I felt when seeing him playing like that with Buz wings.


Mas voltando à terça-feira de Carnaval, para além do fato de Buzz Lightyear preparei uma pequena atividade no tema do Toy Story, um Sr Cabeça de Batata.
Foi muito simples, cortei o formato da batata em papel kraft e colei numa folha de cartolina branca. Depois desenhei as diferentes partes: olhos, nariz e boca, orelhas, sapatos e braços; e recortei. (Há imensos templates disponíveis do Sr Cabeça de Batata, é só pesquisarem no google caso tenham interesse)
Quando ele acordou tinha tudo em cima da mesa junto com o stick de cola. 

But back to Carnival Tuesday, in addition to Buzz Lightyear’s costume, I prepared a small activity within Toy Story theme, a Mr Potato Head.
It was very simple, I cut the shape of the potato on kraft paper and pasted it on a white cardboard sheet. Then I drew the different parts: eyes, nose and mouth, ears, shoes and arms; and cut it out. (There are lots of templates available from Mr. Potato Head, just search on google if you are interested)
When he woke up he had everything layed out on the table together with the glue stick.


A atividade foi super bem sucedida, ele gostou imenso de colar as diferentes partes do Senhor Cabeça de Batata.  A primeira coisa que quis colar foram os braços, ele pôs a cola e pediu ajuda para os colar na cartolina mas depois já foi sozinho colar os sapatos e a seguir os olhos. Um dos olhos ficou basicamente nos joelhos do Sr Cabeça de Batata, e depois o nariz colou-o de pernas para o ar mas ficou a olhar e rodou-o logo. Enquanto fazia as colagens ele ia dizendo que também tinha olhos, também tinha orelhas, etc...

This activity was very successful, he really liked to glue the different parts of Mr. Potato Head. The first thing he wanted to glue were his arms, he put the glue on and asked for help to glue them on the cardboard but then he went alone to glue his shoes and then his eyes. One of the eyes was basically on Mr Potato Head's knees, and then the nose was upside down but he kept looking and rolled it over right after. While doing the collages he kept saying that he also had eyes, also had ears, etc ...


Quando terminou ficou super orgulhoso do seu Sr Cabeça de Batata e andou pela casa de um lado para o outro com ele. A certa altura ficou a olhar muito sério, pegou no olho que estava nos joelhos e pô-lo no sítio certo.
Foi sem dúvida uma boa atividade, que estimulou a destreza manual, a concentração e a capacidade de observação.

When he finished he was very proud of his Mr. Potato Head and walked around the house with him. At one point he stared very seriously, took the eye that was out of place and put it in the right place.
It was undoubtedly a good activity, which stimulated manual dexterity, concentration and the ability to observe and compare.


Quando acabamos o Sr Cabeça de Batata ele pediu mais "vamu colá mais mamã". Tinha aqui uma cartolina pintada por ele uns dias antes e o improviso passou por recortar essa cartolina em diversas formas (aproveitamos e falamos de formas geométricas, o triângulo é a preferida dele) para ele colar numa cartolina branca. E o resultado final ficou bem giro!

When we finished Mr. Potato Head he asked for more. I had a cardboard painted by him a few days before and I improvised by cutting this cardboard in different shapes (we tok the chance to talked about geometric shapes, the triangle is his favorite) for him to stick on a white card. And the final result was super cute!


Share
Tweet
Pin
Share
No comentários
Sim estamos em Janeiro e eu resolvi escrever sobre gelados. Podia dizer que é porque anda tudo de pernas para o ar com esta pandemia e por isso gelados em Janeiro seria só mais uma coisa. Mas não! A verdade é que aqui em casa há gelados todo o ano. E o maior fã ultimamente é mesmo o Tomás.
No último verão durante a quarentena lembrei-me dos gelados que o meu avô fazia em casa. Gelados de groselha em formas de gelado de plástico, e nós adorávamos (pelo menos eu adorava). Resolvi encomendar formas de gelado para fazer gelados para o Tomás, comprei formas de silicone no ebay e formas de plástico no Ikea.
Não fiz gelados de groselha mas gelados de fruta e leite e o Tomás ficou super fã! Ele não bebe leite absolutamente nenhum desde que deixou de mamar. Experimentamos praticamente todos os leites de bebe que há no mercado e por fim o leite de vaca que nós bebemos e ele cuspiu-os a todos, por isso eu também fiquei contente por ele gostar dos gelados com leite. Não é que seja crítico ele não beber leite porque come os restantes laticínios mas assim sempre vai algum leite.
Os primeiros gelados que experimentei foram de framboesa. O Tomás adora framboesas e em casa dos meus pais há várias framboeseiras, vamos colhendo os frutos e de vez em quando (quando sobram) congelo-os. Tinha algumas framboesas congeladas e resolvi usá-las.

Yes it's January and I decided to talk about ice-cream. I could say It's just crazy times and everything is upside down with this pandemic but that's not the reason. To be truth, around here we like ice-cream all year round and lately the biggest fan is Tomás. Last summer I remembered the ice-creams my grandfather used to make us, cranberry syrup ice creams in plastic ice-cream molds and we loved it (at least I did!). So I decided to get some ice-cream molds so I could make some ice-creams, i got some silicone ones from ebay and plastic ones from Ikea.
I did not make cranberry syrup ice-creams but fruit and milk ice-creams. Tomás loves raspberries and at my paresnt house we have several rasperry bushes, we pick them up through time and when there are left over I freeze them. I had some frosen ones and decided to use them for the first ice-creams.


Então para o gelado de framboesa o que fiz foi colocar framboesas congeladas no robot de cozinha e triturar até ficar uma pasta de framboesa. Depois adicionei algum leite e misturei. A quantidade de leite é sempre a olho mas o intuito é que fique com uma consistência pastosa e não muito líquida. Eu acho que esta é a consistência ideal para ele comer o gelado no ritmo dele e sem ficar todo sujo. Se ficar muito líquido enquanto ele come o gelado ao derreter escorre demasiado, ele não gosta particularmente e eu não gosto porque fica tudo sujo.
Entretanto já fiz com outras frutas, como por exemplo:

-1 kiwi, 1 laranja e 1 banana;
- 1 kiwi e 1 laranja;
- 1 kiwi, 1 laranja  e 1 pêra;
- mirtilos;
- 2 morangos e mirtilos.

No caso dos mirtilos é preciso triturar mesmo muito bem porque há tendência para que fiquem muitas casquinhas de mirtilo que depois ao comer não são assim tão agradáveis 
Estes gelados de fruta com leite são sempre um sucesso. Por norma a quantidade que faço dá para pelo menos uns 10-12 gelados dos maiores (os das formas de plástico do Ikea).


So for the raspberry ice-cream what I did was simply put the frosen raspberries in the food processor and grind it to a raspberry paste. Then I added some ilk and mixed it. I don't really measure the amount of milk I put in but it is the needed amount to get a not to liquid mixture, like a soft paste. I think this is the ideal consistency for him to eat the ice-cream at his own pace without getting all dirty. If it gets too liquid when it melt while he is eating it drips too much and makes a mess. He doesn't particularly like it and I don't like it because it gets too messy.
Meanwhile I have made ice-creams with different fruit combinations:

- 1 kiwi, 1 orange and 1 banana;
- 1 kiwi and 1 banana;
- 1 kiwi, 1 orange and 1 pear;
- blueberries;
- 2 strawberries and blueberries.

When it comes to blueberries one must really grind them well otherwise there will be several chunks of its skin which is not very pleasent when eating the ice-cream.
These fruit and milk ice-creams are a success over here. Usually the amount I make is enough for 10-12 of the bigger ice-creams (the ones from Ikea moulds). 


A segunda receita de gelado que faço regularmente, e que o Tomás também gosta muito, é de queijo quark com gelatina vegetal. O nome é bastante descritivo e não há muito a acrescentar, junto uma embalagem de queijo quark com 500ml de gelatina de um sabor à escolha. O importante é ir adicionando a gelatina ao queijo quark lentamente e mexendo bem para que não fiquem grumos. No fim é só por nas formas e congelar.
O Tomás gosta muito de ajudar a fazer os gelado e quando eu ponho a mistura nas forminhas ele faz questão de ser ele a pôr as tampinhas.

The other recipe Tomás also likes and I also make a lot, is with vegetable jelly and quark cheese. There not much to say about it, I basically mix a package of quark cheese (around 250g) with 500 ml of vegetable jelly. The important thing is to add the jelly to the cheese gradually while mixing it so it doesn't become lumpy. In the end just pour it intothe moulds and freeze it.
Tomás really likes to help making the ice-creams and while I put the mix into the moulds he is putting the lids.


Share
Tweet
Pin
Share
No comentários
O Tomás é super fã dos filmes de animação do Toy Story. Curiosamente foi um dos primeiros filmes de animação que lhe despertou o interesse. Neste momento já não sei dizer quantas vezes vimos os 4 filmes e as diversas curtas metragens, que até à bem pouco tempo eu nem sabia que existiam. A personagem preferida dele é claramente o Buzz Lightyear, e quando ele aparece no ecrã ele diz logo "É o Buzzz!" 
Há umas semanas atrás por curiosidade pesquisei no google para ver se ainda se vendiam bonecos do Toy Strory, para minha surprese ainda se vendem mas a maior surpresa foi mesmo o preço. Fiquei chocada com os preços exorbitantes do Woody e do Buzz! Custam quase €70!
Passado alguns dias o meu marido andava a tratar de umas últimas prendas e a mãe tinha-lhe pedido para comprar a prenda dela para o Tomás e ele decidiu comprar um Buz Lightyear, afinal o Tomás gosta tanto do Buzz e é um Ranger do Espaço espetacular (ele também estava sem ideias para prendas da secção dos brinquedos, porque como devem imaginar brinquedos não faltam por aqui por casa, mas isso agora não interessa nada). E assim o Buzz Lightyear veio parar aqui a casa. O Tomás adorou o Buzz, mal abriu o embrulho e viu o que era ficou em êxtase. Desde o dia 24 que dorme com o Buzz para além dos 3 Kiconikos e do elefante Elias com que já dormia, por este andar temos que lhe arranjar uma cama de casal.

Tomás is a huge fan of Toy Story movies. Toy Story 1 was actually one of the first movies that got his attention. At this stage I don't know how many time we have seen all 4 Toy Story movies as well as all the short movies that I didn't even know existed until quite recently. His favourite character is Buzz Lightyear, when he comes up in the screen he immediately says "It's Buzzzz!"
A few weeks ago out of curiosity I decided to look on google if Toy Story toys were still in stores. I was surprised to see they are but even more surprised with their prices. Buzz and Woody cost nearly €70!
Some days later my husband was making some last minute gift shopping and his mother had asked him to buy something for her to give to Tomás and he decided to buy Buzz Lightyear, after all Tomás likes it so much and it is a Space Ranger (also he was out of ideas for toys, has you can imagine he have plenty of toys around the house). So long story short, this how Buzz Lightyear came to our home. Tomás loved it, he was ecstatic when he opened the gift. Since December 24 he sleep with Buzz as well as the 3 kiconiko's and Elia's the elephant. At this pace we will need to get him a king size bed soon.


Apesar do Tomas ter adorado o Buzz nós tivemos uma profunda desilusão, juntamente com alguma indignação devo dizer. Porquê? Ora bem, o Buzz claramente não vale o dinheiro que custa e assemelha-se muito pouco ao brinquedo dos filmes. No entanto, alguém deve acreditar claramente que os brinquedos ganham vida como no filme porque o boneco vinha de tal forma amarrado à caixa. Vinha presos pelos pés, pelas mãos e pescoço com tiras de torcer e com aqueles plásticos de encaixe; e do lado oposto da caixa todos estes atilhos estavam tapados com cartão e colados com fita cola. 
Mas voltando ao brinquedo em si, de aspecto visual claramente é o Buzz Lightyear mas basicamente é isso. A única outra coisa é que quando se carrega num dos três botões da frente ele diz algumas frases como no filme.
O que é que ele não tem? Tudo o resto! 
Não dobra os joelhos nem os cotovelos nem dá para sentar; é um boneco sem qualquer articulação apesar de no nome dizer "Toy Story - Buzz Lightyear - Figura Articulada com Voz". Basicamente roda os braços na zona dos ombros e a anca e pronto.
O laser do braço não existe! Tem lá um autocolante a dizer laser ao lado de um pseudo-botão e pronto, nem uma luzinha vermelha a acender nem nada. O Tomás já andou a tentar carregar no botão que não é botão e fica intrigado porque não vai para dentro, não mexe nem um milímetro. Pois claro, porque nem botão é. è só mesmo uma saliência pintada de vermelho. Uma luzinha vermelha ficava assim tão caro?

Although Tomás loved Buzz toy we were deeply disappointed with it. Why? Well the toy is clearly not worth the money it costs it lacks most of Buzz Lightyear's characteristic features. On the other hand someone must believe these toys come to life when left alone because the toy was tied up like crazy. On both feet, hands and neck and all ties were covered on the other side with cardboard and tape.
But going back to the action figure itself, visually it is clearly Buzz Lightyear but that is basically it. The only other feature it has is that when you press any one of the three buttons on the front it says some of Buzz typical sentences.
What features is it lacking? Everything else!
It does not bend the knees or elbows and it is also not possible to seat down. It basically rotates the arms on the shoulders and it rotates on the waistline.
The laser on his arm does not exist! There is a sticker saying laser and a make believe button and that is it, not even a red light or anything like that. Tomás has already been trying to press that button and got a little intrigued that it can't even be pressed because it is not a real button. Would a little red light be that expensive?

Asas nem vê-las! O Buzz Lightyear não tem asas, como assim? 
Tem o pseudo-botão vermelho na frente para abrir as asas e mais nada. Pelo menos podiam ter pintado as risquinhas vermelhas nas costas a fazer de conta que estavam lá. Deixo abaixo uma imagem do filme (à esquerda) e o nosso Buzz (á direita).

Wings simply don't exist! How is it possible to have a Buzz Lightyear with no wings?
It has a make believe red button to open the wings and that's it. They could have at least painted the red stripes on the back to make it look like there were closed wings in there. Bellow you can see an image from the movies (left) and a photo of our Buzz (right).
Escusado será dizer que o Buzz não brilha no escuro como no filme.
Claro que não tem o menu com tampa no braço como no filme. Aliás, em boa verdade, nem a pintura está correta porque as mãos são todas brancas, nem a risca roxa e o quadradinho verde pintaram.

Needless to say that it does not glow in the dark.
And off course it does not have the arm communication menu as in the movie. Truth being said, not even the colour painting scheme is right because the hands of our Buzz are all white instead of having the purple stripe and the green square.

A caixa também não era em forma de nave espacial mas vá, este detalhe eu dou de barato.
No entanto, sendo fiel ao filme, não há botão para desligar o som (pelo menos no Toy Story 4 a mãe da Bonnie não encontra o botão para desligar). Isto quer dizer que o Tomás leva o Buzz para a cama e depois durante a noite mexe-se e ouve-se em alto e bom som "Sou o Buzz Lightyear, venho em paz!", "Comando estelar estão a ouvir?" ou "Anda! Temos uma galáxia para salvar" ou qualquer uma das outras frases que ele diz.
E já agora, sendo picuinhas, o Buzz tem um buraco quadrangular em cada pé por isso, se algum miúdo quiser imitar o filme e escrever o nome nos pés do boneco boa sorte com isso!


The box was also not a space ship but oh well, that I can accept easily. 
Nevertheless I must say that there is one more feature that is true to the movies, you simply cannot turn the sound off (at least Bonnie's mother is unable to do it on Toy Story 4). This means that as Tomás takes Buzz to bed every night when he turns around in bed we hear Buzz Lightyear out loud.
On the other hand if any kid wants to have their name on Buzz's foot and in the movie, good luck with that because it has a square shaped hole in each feet.


Por fim para ajudar à minha indignação, entretanto percebi que há outros Buzz Lightyear com asas e que falam mas bem mais baratos, só não falam é português! Por exemplo este. 
Senhores da Disney e da Concentra (marca do Buzz Lightyear cá de casa), isto é uma chulice não há outra designação possível.
O comboio que o Tomás tem desde bebé, tem muitas mais funcionalidades do que estes Buzz. Tem várias carruagens que andam sozinhas, diversos botões cada um com músicas diferentes, luzes de cores diferentes, etc e custou metade do preço!
Não sei quanto custa a licença da Disney mas não poder ser esta a justificação por si só.

To sum to my indignation, I realized there are Buzz Lightyear toys with wings and talking and with a laser/ red light, etc that are even cheaper than this one they just don't talk in Portuguese! Like this one for instance.
So Dear Disney and Concentra Sirs this is robbery, I have no other name for it.
Tomás has a train that has a lot more features than this Buzz Lightyear, it has several carriages that move by itself, a series of buttons that play different music when pressed, light of different colours, etc and it cost half the price.
I really don't know the price for a Disney toy license but I don't think that is reason to explain all this.


Share
Tweet
Pin
Share
No comentários
Numa ida a casa dos meus pais eles mostraram-me uns bocados de flanela que estavam lá meio "abandonados" e achei que esta flanela verdinha era uma excelente candidata para um pijama para o Tomás. 
Arranjei botões e vivo azul marinho e pus mãos à obra! 
O molde fi-lo de uma mistura de moldes que tenho. As calças foram do livro  "costura de de palmo e meio" e a camisola foi uma mistura da camisa de rapaz deste mesmo livro e do casaco de pijama da Simplicity 2771 . Fiz esta mistura porque queria o pijama clássico de flanela e gosto particularmente do acabamento do casaco do mas os moldes que tenho são só a partir do tamanho 4-5 anos que é muito grande para o Tomás com 2 anos.
Quanto ao livro "costura de palmo e meio" não gosto particularmente dos moldes deste livro mas uso-os algumas vezes para coisas mais básicas com as devidas alterações. Ou seja, uso como molde base.

One day my parents showed my some flannels pieces "abandoned" at their home and something told me this green one would be perfect for a PJ for Tomás.
I got some navy buttons and pipping and started working on the PJ.
I made the pattern by combining two different patterns. For the trousers I used the PJ trousers pattern from the book "costura de palmo e meio" and for the jacket I combined both the shirt pattern from this book and the PJ pattern from Simplicity 2771. I mixed them up because I really like simplicity's pj pattern but it only starts on size 4-5 years which is too big for my 2 year old.
About this book I must say I don't particularly like the patterns but I do use them sometimes as basis to make my own patterns.


Como a minha máquina de costura não é corta e cose e não sou fã e cortar e chulear porque acho que o avesso não fica nada bonito, fiz costuras dobradas e pespontadas como já é meu costume. (Caso tenham curiosidade neste tipo de costuras podem espreitar este post da made by rae)
O pijama ficou bonito pelo direito e pelo avesso e o tamanho ficou mesmo bem. Esse é sempre o meu maior receio quando improviso nos moldes e os desenho eu, não é claramente o meu forte; mas um diz ainda hei de saber desenhar moldes de raiz.
Apesar de ter feito este pijama em Setembro, a semana passada foi a semana de o estrear, e o Tomás fica super giro cm ele vestido (bem eu sei que sou suspeita porque para mim ele fica sempre giro).

As my sewing machine is not an overlook and I am not a fan of cutting and I am not a fan of pinked seams so I made super seams as I usually do. (if you are interested in these seams look up this post from made by rae).
The pajama turned out great on both sides right and reverse and sizing was just right. Fitting is my major concern when I make the patterns myself, which clearly not my strength; but someday I am gonna be able to draw my own patterns from scratch.
Though I made this PJ in September last week was the time to wear it for the first time, and we looked awesome in it (off course I always think we looks gorgeous so...I am a bit biased).


Bons sonhos!
Sweet dreams!


Share
Tweet
Pin
Share
No comentários
Older Posts

Eu | Me

Sou a Daniela e adoro trabalhos manuais. No meu dia a dia tenho sempre tendência a explorar este meu lado prático e criativo. Não tenho formação em artes, educação nem algo semelhante; mas sim em Bioquímica, Engenharia Biomédica e Gestão. Dito isto, aqui no blog partilho as minhas experiências criativas, incluindo as que exploro com o meu filho, sem qualquer pretensão educativa.

Se gostarem do que vêm ou tiverem questões deixem o vosso comentário.


Posts recentes | Recent posts

Pesquisar neste blogue

Arquivo do blog | Blog archive

  • ▼  2021 (6)
    • ▼  junho (1)
      • Casinha | Home
    • ►  maio (1)
    • ►  março (1)
    • ►  fevereiro (2)
    • ►  janeiro (1)
  • ►  2020 (11)
    • ►  novembro (1)
    • ►  maio (4)
    • ►  abril (6)
  • ►  2016 (6)
    • ►  março (1)
    • ►  fevereiro (3)
    • ►  janeiro (2)
  • ►  2015 (22)
    • ►  dezembro (3)
    • ►  novembro (3)
    • ►  outubro (2)
    • ►  setembro (10)
    • ►  agosto (4)
  • ►  2014 (31)
    • ►  setembro (2)
    • ►  agosto (3)
    • ►  julho (1)
    • ►  junho (2)
    • ►  maio (5)
    • ►  abril (3)
    • ►  março (5)
    • ►  fevereiro (5)
    • ►  janeiro (5)
  • ►  2013 (80)
    • ►  dezembro (11)
    • ►  novembro (11)
    • ►  outubro (7)
    • ►  setembro (12)
    • ►  agosto (8)
    • ►  julho (1)
    • ►  junho (9)
    • ►  maio (5)
    • ►  abril (5)
    • ►  março (3)
    • ►  fevereiro (6)
    • ►  janeiro (2)
  • ►  2012 (24)
    • ►  dezembro (4)
    • ►  julho (1)
    • ►  abril (10)
    • ►  março (9)

Denunciar abuso

Created with by BeautyTemplates